This chapter contains the following topics:
Introduction to Standard Bills
Printing a List of Standard Bills
A standard bill is a packaged set of Services, Goods, and/or Notes line items which your company uses frequently. You can paste standard bills into any invoice or recurring bill. The purpose of packaging predefined line items as standard bills is simply to reduce data entry and ensure consistency.
You can benefit from standard bills even though you may not know in advance the exact quantity or nature of each detail item. Line items introduced into an invoice as standard bills are treated no differently from line items entered manually. They may be changed or deleted at will. Thus a standard bill can serve as a useful template even though you may have to tweak it each time you use it.
Standard bills are optional; if you do not use them this chapter does not apply.
Standard bills are very much like Invoices without the header and totals screens. In some cases this chapter will describe only the differences between the two, avoiding much repetition.
Standard bills may not be nested within other standard bills, but more than one standard bill may be pasted into the same invoice.
Standard bills are not specific to a customer but may be used for any invoice. Consequently, no credit checking occurs upon entry (but credit is checked each time a standard bill is copied into an invoice).
The Standard bills selection is not under batch control, does not generate accounting transactions, and does not require posting.
If you are not interfaced to the PBS Job Cost (J/C) module, this section does not apply.
Standard bills may be copied into invoices for jobs, provided that the invoice is not for multiple jobs. When this happens, each Services line item and each Goods line item is assumed to be for that job.
If a category number is present on a Goods line item, a cost item number is created for the line item by joining the category number from the standard bill to the sub-job and change order numbers:
| • | If the job has sub-jobs but does not bill for them, prior to transferring the standard bill the operator is asked to specify what sub-job to use in building the cost item number. Note that if the job does bill for its sub-jobs, the invoice already knows what the sub-job number is because that is required for billing purposes. |
| • | If the job has change orders, prior to transferring the standard bill the operator is asked to specify what change order number to use in building the cost item number. |
The results can be corrected after the transfer by changing the transferred line items individually.
Select
Standard bills from the A/R menu.
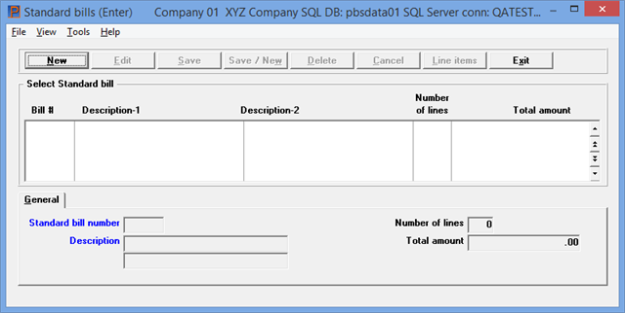
The following screen displays in graphical mode:

The list box displays up to 6 existing standard bills at a time. You may sort the standard bills by standard bill number in ascending or descending order. Only column names in red may be sorted. To select or change the sort order, click on the column name or the arrow to the right of the column name or use the View options.
To locate a standard bill, start typing a standard bill number. You may also use the up/down arrows, Page up, Page down, Home and End keys to locate a standard bill. The <F1> and <SF1> keys function the same as the up/down arrow keys.
Standard bills that display in the list box are available for changes or deletion. The fields for the selected standard bill display in the lower part of the screen. Also the total number of lines and total amount display.
When a standard bill is found, you may select the <Enter> key or Edit button to start editing.
You have the following options with the buttons and keyboard equivalents:
| Button | Keyboard | Description |
|---|---|---|
|
New |
Alt+n |
For entering a new standard bill |
|
Edit |
Alt+e |
For editing an existing standard bill |
|
Save |
Alt+s |
For saving the addition of a new standard bill or for saving the changes to a standard bill. When it is a new standard bill selecting Save takes you to the line items screen |
|
Save/New |
Alt+w |
This is a combination of the Save and New buttons |
|
Delete |
Alt+d |
To delete a standard bill |
|
Cancel |
Alt+c |
To cancel adding or editing a standard bill. Your entries will not be saved |
|
Line items |
Alt+l |
To access the line items of an existing standard bill for entering, editing or deleting them |
|
Exit |
Alt+x |
To exit the standard bill window |
Character mode
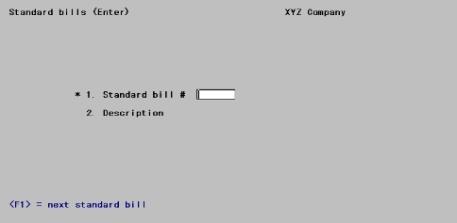
From this screen you can work with both new and existing standard bills. If a standard bill has already been entered for the standard bill number you specify, it will appear and be available for changes or deletion.
Enter a number for this standard bill, or use one of the options:
Options
You may use the option:
|
<F1> |
For the next existing standard bill |
|
<SF1> |
For the previous standard bill |
If an existing standard bill is entered or selected, its description displays; also a count of its line items.
|
Format |
6 characters |
|
Example |
Type 4 |
Description
Enter a description for this standard bill. This field is required.
|
Format |
2 lines of 25 characters each |
|
Example |
Type Standard bill #4 for the first line Press <Enter> for the second line |
Graphical Mode
Select the button that is appropriate. When it is a new standard bill selecting the Save (Atl+s) button takes you to the line items screen. See Buttons.
Character Mode
Field Number To Change ?
Make any needed changes. For an existing entry you may use one of the options:
Options
You may use the option:
|
<F1> |
For the next existing standard bill |
|
<SF1> |
For the previous standard bill |
|
<F3> |
To delete this entry |
Press <Enter> when done making changes. If this is a new entry, the line-item screen (described below) will appear automatically.
Do You Wish To Change The Line Items ?
This question is asked only if this is an existing entry and in character mode. Answer N to terminate this transaction and proceed to the next standard bill. Answer Y to continue to the line-item screen.
|
Format |
One letter, either Y or N. The default is N. |
|
Example |
(Does not occur in this example) |
Each line item of the bill is entered on either the Goods, Services or Notes tabs.
A standard bill may have up to 9,999 line items. Typically it has at least one. A standard bill with no line items at all is legitimate, but not useful.
The following line entry screen appears:
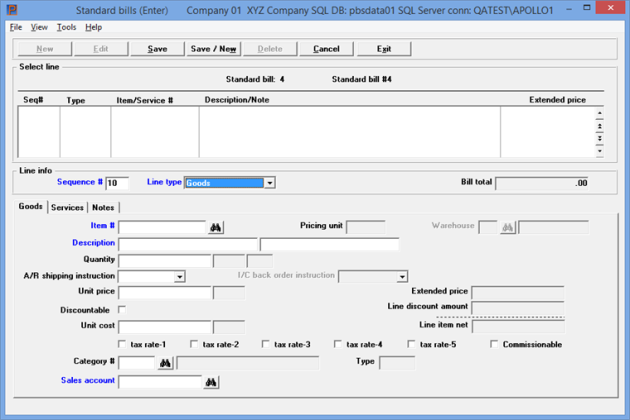
The list box displays up to 6 existing standard bill lines at a time. You may sort the standard bill lines by sequence number in ascending or descending order. Only column names in red may be sorted. To select or change the sort order, click on the column name or the arrow to the right of the column name or use the View options.
To locate a standard bill line , start typing the sequence number. You may also use the up/down arrows, Page up, Page down, Home and End keys to locate a standard bill. The <F1> and <SF1> keys function the same as the up/down arrow keys.
Standard bill lines that display in the list box are available for changes or deletion. There are three tabs: Goods, Services and Notes. The fields for the selected standard bill line type display in the lower part of the screen. Also the total number of lines and bill total amount display.
When a standard bill line is found, you may select the <Enter> key or Edit button to start editing.
You have the following options with the buttons and keyboard equivalents:
| Button | Keyboard | Description |
|---|---|---|
|
New |
Alt+n |
For entering a new standard bill line |
|
Edit |
Alt+e |
For editing an existing standard bill line |
|
Save |
Alt+s |
For saving the addition of a new standard bill line or for saving the changes to a standard bill line |
|
Save/New |
Alt+w |
This is a combination of the Save and New buttons |
|
Delete |
Alt+d |
To delete a standard bill line |
|
Cancel |
Alt+c |
To cancel adding or editing a standard bill line. Your entries will not be saved |
|
Exit |
Alt+x |
To exit the standard bill line window |
Character mode
Each line item of the bill is entered on a separate screen.
To terminate processing this standard bill, press <Esc> from Field #1 of any line-item screen.
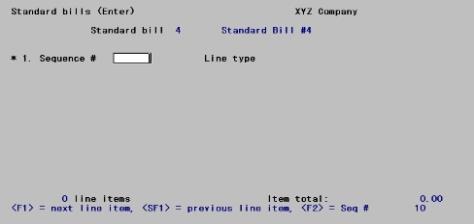
From this screen you can work with both new and existing line items. The layout of the screen depends upon the type of line item; initially only Field #1 appears.
Enter the information as follows:
In graphical mode, this field is filled in automatically and skipped. To go to the sequence number field and change it manually you may select the <Shift+Tab> keys or click on the field with your mouse.
Line items are in sequence by an arbitrary number, which by default is assigned in increments of ten. Enter a sequence number, or use one of the options:
Character Mode
Options
You may use the option:
|
<F1> |
For the next existing line item, if any |
|
<SF1> |
For the previous existing line item |
|
<F2> |
For a new line item, to be added at the end of the standard bill and to be given a sequence number ending in zero |
Normal practice when entering a new standard bill is to use <F2> for each line item.
If you select an existing line item (either by direct entry of a sequence number or by using the option keys), that item is displayed in the appropriate format and the cursor is positioned at Field number to change ?.
|
Format |
9999 |
|
Example |
Press <F2> to assign sequence number 10. |
Enter a line type from among:
|
Character |
Graphical |
|
G |
Goods |
|
S |
Services |
|
N |
Notes |
The tabs of the line item types differ so much in appearance that each is described in a separate section.
|
Format |
Graphical: Drop down list of Goods, Services and Notes Character: One letter from the list above |
|
Example |
Type G |
Upon typing G for Line type, the following screen appears:
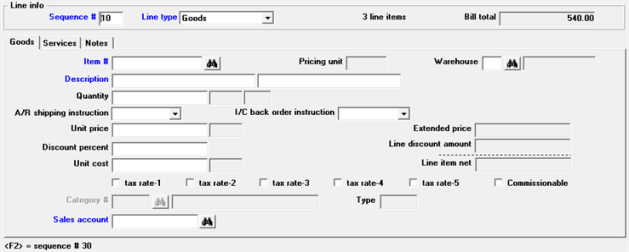
This tab closely resembles the invoices tab.
Character Mode
After pressing <F2> for Sequence # and typing G for Line type, the following screen appears:
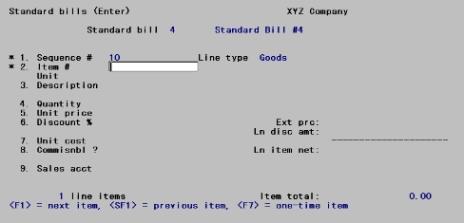
This screen closely resembles the corresponding screen in Invoices.
Enter the inventory item number. This item (even a miscellaneous item) must be in I/C Items. However, it must not be a serialized or lot item; these can only be sold through O/E. You may use one of the options:
|
<F1> |
For the next item on file, in item number sequence |
|
<SF1> |
For the previous item |
|
<F7> |
To look up the item by description |
If you pressed <F7>, the cursor moves to the Description field. Enter the item’s description (or any portion of it beginning with the first letter). Your options are:
|
<F1> |
For the next item on file, in item description sequence |
|
<SF1> |
For the previous item |
|
<Enter> |
To return to lookup by number |
This field is skipped except for miscellaneous items.
The unit or conversion factor, in effect when an invoice is entered, remains on that invoice, even if you subsequently change it using I/C Items.
Options
Enter the unit of measurement or use the option:
|
<F2> |
For EACH |
If I/C does not use multi-warehousing, skip this section. Otherwise:
| • | If A/R Control information specifies that multiple warehouses are not used, you cannot enter a warehouse because the default warehouse is assumed. If the item is not stocked at that warehouse you are warned of the fact but allowed to continue (you will be able to select an alternate when you come to the Quantity ordered field). |
| • | If A/R Control information specifies that multiple warehouses are used, enter the warehouse you wish to ship from. The warehouse must have been defined in I/C Warehouses (blank for Central is a valid entry), and the item must be stocked at that warehouse. |
Options
You may use the option:
|
<F2> |
For the default warehouse from A/R Control information |
This field appears as Quantity instead of Qty ordered in Invoices. You cannot enter a negative quantity as returned goods do not happen on standard bills.
You may not view alternate items (<F2>) or alternate warehouses (<F5>), nor may you view quantities (<F3>) for this item.
No check is made at this time that the quantity ordered is in stock.
This defines what happens if the quantify available at the warehouse specified is insufficient. Enter one of the following:
Options
|
Character |
Graphical |
Description |
|
S |
Ship in stock |
Ship whatever is in stock |
|
O |
Override |
Ship the entire quantity (anticipating a receiving) |
You may use the option:
|
Format |
Graphical: Drop down list Character: One letter from the list above |
|
Example |
Type S |
This field defines Inventory back order instructions. Enter one of the following:
|
Character |
Graphical |
|
S |
Ship in Stock |
|
O |
Override |
|
A |
Back order all |
|
B |
Back order balance |
|
Format |
Graphical: Drop down list Character: One letter |
|
Example |
Type S |
The default price does not take into account any customer-specific sale or contract pricing.
Changes to the price and cost in Items are not automatically applied to standard bills. Also, when a sale expires, any standard bills that use those prices continue to do so. Be on guard against inadvertently using obsolete prices when you copy standard bills.
Depending on the Discount type setting in Control information this field may or may not be available.
Enter a discount percent.
Depending on the Discount type setting in Control information, this field may or may not be available.
Check to box to determine that this line can be discounted.
Each time the standard bill is copied into an invoice, the cost used is the current cost, not that in effect at the time the standard bill was originally entered.
Job # and Sub-job #
These fields do not occur. See the discussion in the Standard Bills and Jobs section of this chapter.
Scrap acct and
Credit acct
These fields do not appear. Returned goods do not occur on a standard bill.
The format of this varies depending on your answer to Taxable by tax rate in Control information:
| • | If you left it unchecked, a single check box flag controls whether or not this line item is subject to all the tax rates in this invoice’s tax code. |
| • | If you checked the box, there are one to five flags separated by slashes — one for each of the tax rates in that tax code. |
Each flag is either checked or unchecked (Y or N), corresponding to the taxability code on file for this inventory item in I/C Items. Even miscellaneous items have default taxability codes.
Whether or not you can change this default depends upon your answer to the question Taxable by line item in Control information:
| • | If you left the Taxable by line item field unchecked, you may not change this field. The overall tax for the invoice may still be changed from the totals screen once you get to it. |
| • | If you checked that field, you may change the taxability but only from Field number to change ?. |
If you left the Taxable by tax rate field unchecked, specify whether or not the item is taxable.
This field is skipped if Control information specifies that you do not use commissions.
Otherwise, accept the default of checked if a sales representative will be entitled to a commission on this sale, or uncheck it if not.
This field replaces the Cat-sub-cng field of Invoices. Category is one of the three segments of a cost item, and the only one that is entered in standard bills. For an explanation of where the other two segments come from, refer to the Standard Bills and Jobs section of this chapter.
If you do not enter a category the field description displays as (Item cost does not go into jobs).
If you want the cost of this line-item transferred to Job Cost when the invoice is posted through I/C, enter a category number. If J/C Control information specifies that Categories must be used, your entry must be a valid category, and you may use the options:
Options
You may use the option:
|
<F1> |
For the next cost category from J/C Categories |
|
<SF1> |
For the previous cost category |
If a category number is present when a standard bill is inserted into an invoice that is not for a job, it is ignored.
|
Format |
999999 |
|
Example |
[This field does not appear, since J/C is not interfaced.] |
If you do not distribute sales per A/R Control information the Sales account cannot be changed and also:
| • | Using graphical mode the field displays but cannot be changed. |
| • | Using character mode this field does not display. |
When you are distributing sales using graphical mode enter the sales account or use the default. Using character mode the cursor does not move to this field on initial entry, but it ca n be changed from Field number to change ?.
Sales account is entered as a main account only or when using cost centers as a main and sub account. It does not have to be one of the sales accounts defined in Control information. It defaults to the item sales account.
If you are interfaced with Job cost and you specified a Category #, you may select <F2> to assign the Billing account from Job Cost Control information.
You may use the option:
Options
The following option may be used:
|
<F2> |
For the previous contents of this field |
Selected into an Invoice
If you use cost centers, when the standard bill is selected into an invoice a cost center is prefixed to the account number — either the cost center from the invoice header or the one from the I/C item, whichever source has been specified in Control information.
Note that this happens even if the invoice is for a job and a category code has been specified for this line item. If you wish to use the job’s billing account instead, use the <F2> default after the standard bill has been transferred.
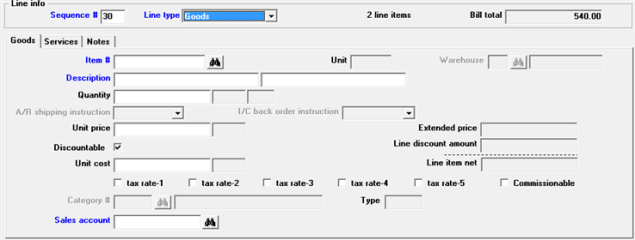
Upon selecting the New button the following screen displays:
Character mode
Upon pressing <F2> for Sequence # and typing G for Line type, the following screen appears:
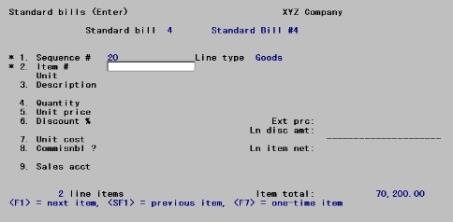
This screen closely resembles the corresponding screen in Invoices. Only the differences will be noted here.
Enter the good from Goods and services or use one of the options:
|
<F1> |
For the next goods entry in the Goods and services selection |
|
<SF1> |
For the previous entry |
For an item already in Goods and services the description displays automatically. You can change this or press <Tab> in graphical or the <Enter> key in character, twice, to accept it as is.
If you are entering a new item, enter the description of the item.
You cannot enter a negative quantity.
Changes to the price and cost in Goods and Services are not automatically reflected in the outstanding standard bills. Be on guard against inadvertently using obsolete prices when you copy standard bills.
If you unchecked (no) to Taxable by line item in Control information, this field can be entered but only for the first rate.
This field is skipped if Control information specifies that you do not use commissions.
Otherwise, accept the default of checked if a sales representative is entitled to a commission on this sale, or uncheck it if not.
Job # and
Sub-job #
These fields do not occur. See the discussion in the Standard Bills and Jobs section of this chapter.
Category #
This field cannot be entered for a good from Goods and services.
Type
This field cannot be entered for a good from Goods and services.
If you do not distribute sales, per A/R Control information, the Sales account cannot be changed.
The Sales account from the Good is used if the Control information Default sales account to Goods / Services account is checked. Otherwise it defaults to one of the Sales accounts from Control information.
It does not have to be one of the sales accounts defined in Control information.
Options
You may however use one of the options:
|
<F1> |
For the next sales account in Control information |
|
<SF1> |
For the previous sales account |
If you use cost centers, when the standard bill is selected into an invoice a cost center is prefixed to the account number either the cost center from the invoice header or the one from the I/C item, whichever source has been specified in Control information.
Note that this happens even if the invoice is for a job and a category code has been specified for this line item. If you wish to use the job’s billing account instead, use the <F2> option after the standard bill has been transferred.
The sequence number fills in automatically. To go to the sequence number field and change it manually you may select the <Shift+Tab> keys or click on the field with your mouse.
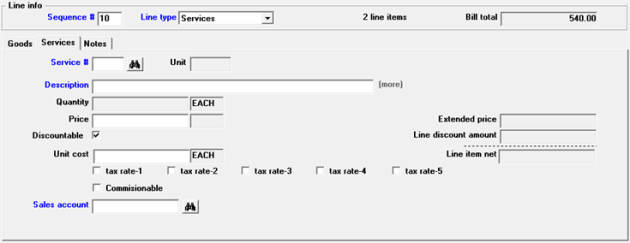
After entering the line type as Services the tab looks like this:
Character Mode
The following screen appears:
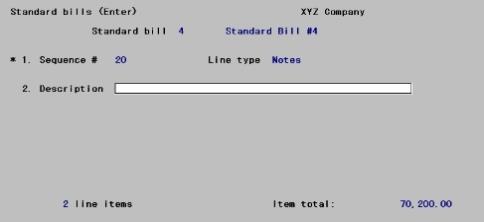
This screen closely resembles the corresponding screen in Invoices.
Enter the service number or use one of the options:
|
<F1> |
For the next service in Goods and services |
|
<SF1> |
For the previous service |
|
<F7> |
For a one-time service (one that is not in Goods and services) * |
* A one-time service has a blank service number and is identified only by its description. It is used only on this standard bill and is not added to Goods and services.
You can enter a service number that is not already in Goods and services, in which case you are so informed and asked whether you want to enter it anyway.
| • | If this is merely a keying error, select No to re-enter the service number. |
| • | Select Yes to use this service number anyway. You are asked whether it should be added to Goods and services. This gives you a chance to enter new services as you go. |
Answer N to use the service on this standard bill only.
Answer Y to add it to Goods and services. This has the same effect as entering it using the Goods and services (Enter) selection.
If this service is in Goods and services the unit displays automatically and cannot be changed.
There are two types of services:
| 1. | has a unit of measure which allows a quantity can be entered |
| 2. | has a flat rate which means it does not have a unit of measure and a quantity cannot be entered |
Options
If this service is not in Goods and services enter the unit for this service, or use the option:
|
<F2> |
For HOUR |
This field cannot be entered for a service which either is not charged separately or is charged at a flat rate. When this is the case the field displays as None.
If this service is in Goods and services its description displays automatically. You can change this or press <Tab> to accept it as is. Use the <Enter> key in character mode to accept it.
If the service is not on file, enter the description of the service.
Using graphical mode a field displays where you may enter up to 10 lines of description. If more than 1 line of description has been entered the word (more) displays. When the word is black this indicates that more than 1 line of description has been entered and you may click on (more) to view additional lines of description, even when you are not in edit mode. When the word is grayed out this means there is only 1 line of description for the service.
Negative quantity is not allowed.
If there is a unit for this service, enter the price per unit. If there is no unit, enter the total price of the service.
Options
If the service is on file, you may use the option:
|
<F2> |
For the price on file for this service in the Goods and |
If this is a unit price, the quantity is automatically multiplied by this price and the extended price displays.
This field is the same for services as for goods.
Enter the cost per unit for this service, if a unit has been specified; otherwise the total cost. You may use the option:
|
<F2> |
For the cost on file in Goods and services |
Although not seen by the customer, the unit cost is important because it is used to calculate the profit margin on this line item. This is required if you pay commissions based on margin. When posting an invoice it is also passed through A/R Miscellaneous Charges and is included in the cost of the sale on the Sales Journal.
Taxability for services is entered in the same way as for goods.
This field is skipped if Control information specifies that you do not use commissions.
Otherwise, check this box (yes) if a sales representative is entitled to commission on this line item, or leave it unchecked if not.
Sales account is entered as a main/sub account (no cost center). It does not have to be one of the sales accounts defined in Control information.
If the Default sales account to Goods / Services account in A/R Control information is checked a sales account was entered in Goods and services it becomes the default account.
Options
You may however use one of the options:
|
<F1> |
For the next sales account in Control information |
|
<SF1> |
For the previous sales account |
If you use cost centers, when the standard bill is selected into an invoice a cost center is prefixed to the account number either the cost center from the invoice header or the one from the I/C item, whichever source has been specified in Control information.
Note that this happens even if the invoice is for a job. If you wish to use the job’s billing account instead, use the <F2> option after the standard bill has been transferred.
After selecting the New button and selecting a line type of Notes the notes tab displays:
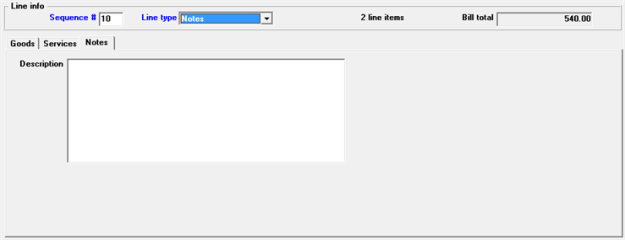
Description
You may enter up to 10 lines of 50 character each line.
Character Mode
Upon pressing <F2> for Sequence # and typing N for Line type, the following screen appears:
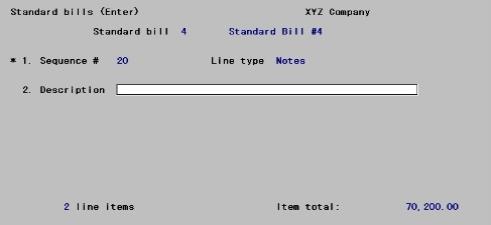
This screen is entered identically to the corresponding screen in Invoices.
Select
Standard bills list from the Reports, general menu.
A Standard Bills List example is in the Sample Reports appendix.
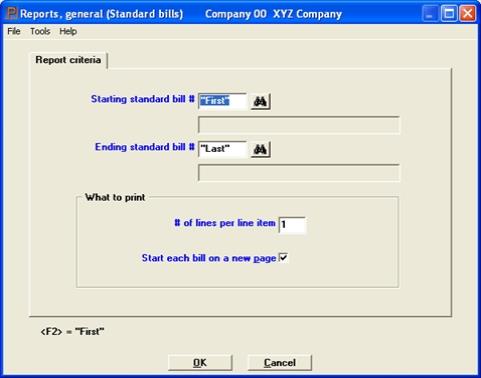
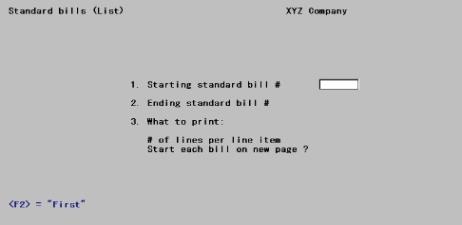
The following screen appears:
Graphical Mode
Character Mode
Enter information as follows:
Starting standard bill # and
Ending standard bill #
Options
Enter the range of standard bills to include. You may use the option:
|
<F2> |
For the First starting standard bill or Last ending standard bill |
|
Format |
6 characters |
|
Example |
Press <F2> at both fields |
What to print
Select what information to include for each standard bill on the list.
Options
Enter the number of lines you want to display for each line item. If you enter 0, no line items will show and the list will have only the standard bill numbers and titles. You may use the option:
|
<F5> |
For All lines |
Checking this box or enter Y to print each bill on a separate page.
|
Format |
Graphical: Check box where checked is yes and unchecked is no Character: Y or N |
|
Example |
Press <F2> at both fields |
Select OK to print the report or Cancel to return to the menu without printing.